How to Glue Plywood Together
Plywood is the most common material used during any construction project. Plywood is made up of thin layers of wood that are glued together. The gluing will make plywood ideal for building thicker, stronger, lightweight structures.
Do you have to glue plywood for a particular project? Knowing how to glue plywood together is important, whether you are making a furniture piece, such as a desk or cabinet. This guide will show you how to glue the plywood to make your project perfect.
Let’s get started!
Can I glue two plywood together?
The number of ply is essential to consider when gluing plywood. You’ll need a strong glue like polyurethane or epoxy to join two sheets of plywood, to know the exact differences between normal super glue and high quality epoxy read this information article now. Ensure both pieces of plywood have been cleaned and dried before you start. Dirt or moisture can prevent the adhesive from adhering well. Make sure the edges of your plywood are even and flush.
You can use either a brush or a roller when applying adhesive to ensure it is spread evenly. Make sure you glue both pieces of plywood together at the same time. The pieces will be less likely to move when you press them together.
You can clamp the plywood until the glue is dry after you’ve applied the adhesive. Apply pressure evenly, and don’t move the clamps. You’ll also need to wait until the adhesive dries. Depending on the adhesive, this can take anywhere between a few minutes to a couple of days. After the glue dries, the plywood is securely glued together.
How to glue plywood together?
Tools Required
- Roller or Brayers
- Quality Wood glue
- normal Drill
- Safety glasses
- cauls for Clamping
- newspaper or Plastic sheet
- quality Drywall screws/wood screw
- superior Sawhorses
- decent size Plastic putty knives
- supplementary wood for emergency
- Plywood
- Work gloves
- Safety mask
It’s now time to get started. If you want the best results, don’t miss out on any information.

Step by step Guide shared here:
Step 1. Prepare the workstation
You will need to prepare your workstation before you can install the plywood. This will require some tasks, such as ventilating the workstation. Remove any dust or other obstructions.
Wear heavy-duty gloves, a safety mask, safety glasses, and a coverall. You never know where and when the glue will stick to your body.
Step 2: Select the exterior sheet of quality plywood
The exterior sheet of quality plywood may not seem like a problem, but it is the best choice. It should be the strongest and most beautiful plywood sheet among many.
Step 3: Applying the adhesive
Some adhesives will not work on wood. You will need to choose a suitable glue.
Consider the amount of glue you would require to bond the plywood sheets. A lack of bond can result in a weak hold. A slippery surface can also result from too much. It can also take longer to clamp.
How to glue marine plywood together? It is not necessary to use a specific method for gluing plywood pieces together after the glue is applied evenly. You know how to glue; zigzags or slight waves are good options.
Step 4: evenly Spread glue on the plywood sheet
You can use one of three tools to spread to your adhesive over the entire plywood surface.
- A brayer
- A roller
- a squeegee
Prepare enough glue to cover the plywood on one side with a thin, even layer. This will allow you to lay down the next plywood sheet firmly.
Step 5 – Lay your 2nd sheet of quality plywood over your first sheet end to end
Move to the second sheet after you have finished gluing up the first. How do you glue two sheets of plywood together? The second sheet should be placed over the first and continue until completion.
You can introduce air into the layer when you add the second sheet. You can use this tip to help you: place the scrap sticks on the glued side and then layer the second sheet of plywood on top.
Then, remove each stick one at a time. The plywood sheet will gently land on its glued side, minimizing the air bubbles.
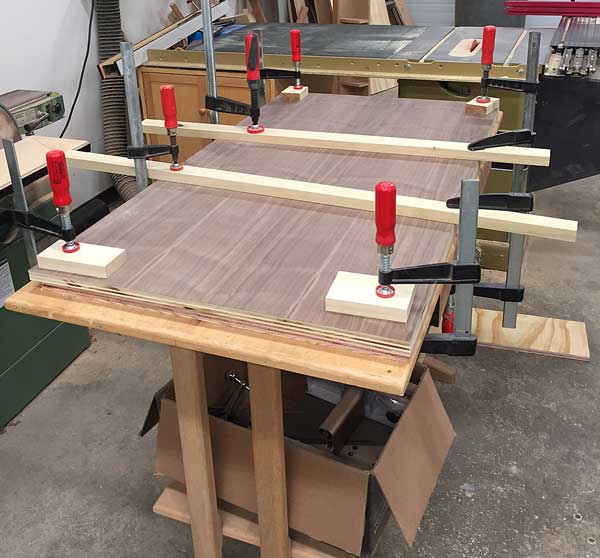
Step 6 – Clamp over both of the plywood sheets.
After you have glued all the plywood sheets, it is time to clamp them. Be sure to align all edges perfectly before you connect them.
You can use a wide range of different sized clamps to hold the sheets together until the glue dries.
Cauls can be used to apply even pressure on large plywood pieces. It is best to place wax paper on top of the plywood sheet to avoid clamp marks.
Step 7: put in the screw
How do you glue plywood sheets? till the glue dries, it is common to screw these sheets together. This step can be done with either the wood screw or drywall screw.
Step 8: Remove all of the excess adhesive
You must remove all excess adhesive from your plywood. You can use damp cloths to clean the adhesive to remove all glue traces.
You should remove the excess adhesion by using plastic putty if you have it.
Step 9: Let your adhesive set
After you have applied the glue to the plywood sheet, it will take some time to dry. You will need to let the glue set to ensure a good hold.
Step 10: Complete the project
You can skip this step if you prefer the look of plywood. This step requires you to apply one protective coat. Although plywood seems to be a durable material, it may likely wear out after long time.
How to make choice of the Correct type of plywood?
There are different types of plywood, and they all suit different projects. This quick guide will help you select the best type of plywood for your particular project.
- Choose marine-grade plywood if you want plywood that is strong and durable. This type of plywood can be used for boatbuilding as it is resistant to moisture and harsh conditions.
- Baltic Birch plywood is a good choice if you want plywood that’s easy to work. This plywood is lightweight and strong because it’s made from thin layers of Birch wood.
- Choose treated lumber plywood if you want affordable plywood. This type of plywood, which is durable and inexpensive, is used in many construction projects.
How to connect two ends of plywood?
Make sure the pieces are free of dirt and debris. Use a dampened cloth to wipe away any dirt or debris. After the pieces have dried, apply a thin coat of wood glue on one of them. Be sure to cover the surface evenly. Repeat the process for the second piece.
Place the pieces together after the glue is applied. Make sure that the pieces are firmly glued together. Use a clamp once the pieces are attached. Be sure to tighten the clamp and secure the pieces tightly. Keep the clamp on for at least one hour or until the glue completely dries. After the glue has dried, remove the clamp and connect the two pieces of plywood. You can now finish your project and enjoy the finished product.
When should you glue 2 or or plywood together?
-
Increase Durability and Protect
You can save money by using a thick piece of low-cost plywood and then gluing a thin layer of high-quality, waterproof (or water-resistant) plywood. Instead of using a large piece of expensive plywood, consider gluing it to the surface with a thin piece of waterproof plywood (or water-resistant plywood). This technique is highly cost-effective.
-
Achieving thickness
Depending on how thick the plywood is, you may have to glue together two pieces of plywood. Imagine you are looking for 3-inch-thick plywood, but all you can get is 1.5-inch-thick ones. If this is your situation, you’ll have to glue the two sheets together to get a 3-inch-thick sheet of plywood.
-
Veneering or Laminating
You’ll likely want to laminate a plywood table, countertop or any other similar surface if you are making it yourself. You can purchase it already laminated, but if you want a specific look, it might be worth it to laminate it yourself.
Laminating plywood will make it more attractive and durable. You can “laminate” or cover plywood with real wood to make it look like solid wood. if you are looking to remove paint from your wood laminate floors then i have written a detailed guide for you to read and do it carefully.
Tips and Tricks
If the suggestions above are insufficient, here are some additional tips to make things run more smoothly.
- You should only use PVA wood adhesive if it’s suitable for wood.
- Before you attempt to attach the plywood together, make sure that all surfaces are clean.
- Gloves and goggles are essential when handling any glue.

Conclusion
You may have to glue plywood together if you are in carpentry or construction or just want to complete a home project. The operation is simple but must be performed correctly. The plywood pieces will not stay in place if they aren’t firmly adhered to.
Frequently Asked Questions
What’s the best glue to use for plywood?
Polyvinyl Acetate is the best wood adhesive. It is available in both white and yellow colors. Polyurethane and urea formaldehyde are also options.
What’s the difference between laminated wood and plywood?
Both plywood and laminate wood consist of thin veneers that are glued. The wood grain is the main difference. The grain is parallel for laminate wood, but for plywood, the alternate layer’s grain is at an angle. The upper layer of laminated wood is usually printed with a glossy or matte finish, while plywood has a plain wood look.
What is the best way to remove excess glue?
Wipe off excess glue using a damp cloth. If you have dried glue on your work, you can remove it by pushing plastic putty against it and pulling it.

Being associated with art and craft field since decades as a hobbyist and life long learner has given me an opportunity to learn many new things related to art, craft, paints and pottery which i am trying to share with your guys on this website. I have expertise of being professional painter and potter for the last 20+ years
I have learned mind blowing cool tips and insights which makes me a person with ability to improvise and come up with creative ideas and solutions to make stunning and impeccable art pieces of all types which are adored by people across the globe on this website and other platform.


