How To Patch a Gas Tank
This blog will show you how to repair a gas tank so you can drive your car or your customer without worrying about running or leaking gas. If you can’t replace your gas tank, there are a few ways to patch a leak on the bottom of the tank. You can use super bond glue or silicone sealant. These methods are similar and work for most small leaks.
However, there are some differences that we will explain below. Which approach is best? I leave it to you since working with glue and gas can is sticky and dangerous. Extreme caution is recommended!
Gas tank problems
Rust damage is usually the cause of gas tank leaks. Water in the fuel system combines with oxygen molecules and causes rust on the metal surfaces of the tank. You should not leave any liquid after draining the old gasoline. The pressure from gasoline vapors will cause a leak if rust builds up on the walls of the gas storage unit in your car.
Rust on screw threads is one of the most common issues. It can make attaching or removing tank parts difficult, causing further damage and gas leakage. Before you attempt to patch up any rust, ensure all traces are removed. Consider replacing the old gas tank in your vehicle with a stainless steel one if necessary.
What works for patching gas tanks?
You can patch up a damaged or leaking gas tank in several ways, but these are not interchangeable. Some methods best suit small areas, while others work well for large damage. Certain techniques are not effective on certain types of damage.
We’ll look at some of the best options and see what they offer.
Silicone Sealant
Silicone sealant is the most popular and obvious option for gas tank repair. This sealant is unique in its properties and offers many benefits. It’s heat resistant and stable at a range of temperatures. It is also extremely moisture-resistant. It also creates watertight seals by repelling water.
The silicone sealant is resistant to many weather conditions. It is also low in toxicity, chemical reactivity, and thermal conductivity. It can be used to seal anything from electrical wires to gas tanks.
Silicone sealant is widely used in many industries and for many materials. It is easy to apply this adhesive with the caulking gun. After a few days, the silicone will harden, leaving you with a strong, secure bond.

Epoxy Glue
The use of epoxy resins is another excellent option for repairing gas tanks. However, they are only suitable for small areas. You’ll need to weld if there is extensive damage. Epoxy adhesive can repair small damages such as pinholes or hairline cracks.
Epoxies can also bond to many materials, including metals, plastics, and most types of wood. Epoxies will likely work on any tank.
Epoxies are available in a variety of formulas and specifications. You can find epoxy for any application, including those that require high resistance to temperature or ethanol.
The long cure time is the main disadvantage of epoxy adhesive. Epoxies need 24 hours to fully cure; some may take longer. Some epoxies have much shorter cure times.
Welding
Welding is the third option, and it’s more complicated. When you weld, you use high heat to melt and fuse the two components. The materials form an unbreakable bond as they cool. This is the most durable method, but it requires some additional equipment and knowledge to make it work.
Protective equipment, as well as welding tools, is essential. Also, it’s important to note that welding is only effective on certain materials. These include metals and thermoplastics.
Most plastic gas tanks are constructed of high-density Polyethylene, a tough petroleum thermoplastic that can be used for welding. In general, welding is the best solution to a deteriorated gas tank. It is a long-lasting solution. This is the best solution if you must fix significant problems, such as large holes and rust damage.
How do you patch a gas tank? A detailed guide
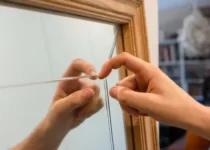
When the metal in that area is compromised, it’s necessary to patch a gas tank. You can use various methods, each with advantages depending on your goal. Epoxy is one of the most popular methods to patch gas tanks. This is usually used when installing a new floor pan. You can also use epoxy to repair a small gas tank part.
- Before applying epoxy or glue, clean the surface thoroughly. If necessary, use acetone to remove oil, grease, or rust from the surface. Wipe down with a rag once cleaning is complete.
- Primer (if necessary) can be applied. Primer is needed if metals have already been painted at least twice. If the metal is bare, the primer will only be needed for one coat.
- Follow the manufacturer’s instructions to allow the primer to dry before continuing.
- Masking tape can be used to outline the repair area. This will ensure that the epoxy does not seep past the line you have marked.
- Don’t add more than two layers at a time, as each layer requires time to cure (about 20 minutes). The epoxy adhesive used to repair gas tanks can take 24 hours, depending on the thickness of the coating.
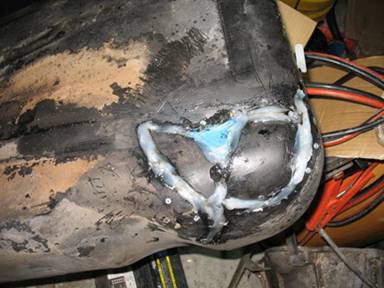
- If your gas tank has been damaged by corrosion, you can use an epoxy sealer (or fiberglass matting and polyester resin) to repair it. This works well for tanks that are rusted. Fiberglass repair kits consist of polyester resin and fiberglass matting. They are used to fill in any cracks or holes that may have occurred in the tank. This will prevent future leaks.
- Vaseline (petroleum jelly) should be applied around the area you are applying epoxy or glue to ensure that it will not cause any problems moving from one side of the surface to another. This should cover approximately 12 inches per time. Wear gloves to protect against chemicals during the entire process. Gas exposure can cause serious skin irritation, breathing problems, and other health hazards. Vaseline should be applied to all work surfaces and tools so there are no problems as you move from one side of the room to the other.
- Before you begin how to repair a gas tank, ensure that the area where you will be applying glue or epoxy is completely dry. If necessary, use acetone or rubbing alcohol and let it air dry for several days. Ensure all fumes have been removed before applying a second coat of adhesive.
- Use fiberglass tape or matting to cover the damaged area. Work in small sections (12″x12”), and wet each strip with resin. Apply over the metal surface. Be careful not to overlap, as this will lead to weak areas that may cause cracks and, in some cases, even cause an explosion.
- You should end up with a nice flat surface once dried. Keep applying pressure, smoothing out any bumps as best you can. Once dried, you should have a flat surface. Keep applying pressure and smoothing out any bumps. Work around the gas cap area, as it sticks out more than other metal surfaces. Let epoxy glue for repairing gasoline tanks completely dry.
Is there a leak in my gas tank?
Here are some common signs that a gas tank is leaking.
-
Your vehicle is emitting a fuel smell.
Fuel has a distinct smell that is familiar to all drivers. Fuel can be smelled when you drive as it ignites inside the engine. However, it will usually disappear quickly. The smell of fuel can last for some time or persist even when the car is stopped at a traffic light or when you walk up to it.
-
The fuel gauge drops suddenly and without reason.
Checking your gauge regularly is probably the best way to determine if you have a leaky gas tank. You might not notice a leaky gas tank unless it is a considerable amount. You may notice that you need to visit the gas station more often than usual, or when you fill it up, it doesn’t seem to go as far. You might be left scratching your head, but it’s hard to tell.
You can prove you’re losing fuel by looking at the fuel gauge on your car when it is parked. Even if your vehicle is parked or not running, if the fuel gauge hand falls significantly, it may indicate a leak in the gas tank.
-
You may notice visible stains or moisture spots under your vehicle.
Fuel tends to evaporate quickly, and you will not be able to see the stain. If your car is parked and hasn’t been driven for some time, you may be able to see a stain. Look for spots of water in the area below the tank. If your car is parked outside on grass, you should notice a withered or dead grass spot.
Conclusion
You’re in no danger if you carefully follow the instructions. The gas tank will no longer leak and won’t even explode.
Frequently Asked Questions
Can you patch a gas tank?
You can repair the gas tank.
How to fix a leaky gas tank?
Epoxy can be used to repair a gas tank.
What tools are needed to repair a gas tank?
The tools needed to repair the gas tank are sandpapers, gloves, safety goggles, and rags. Paint thinner (or another solvent) compatible with your new patch’s material should also be on hand.

Being associated with art and craft field since decades as a hobbyist and life long learner has given me an opportunity to learn many new things related to art, craft, paints and pottery which i am trying to share with your guys on this website. I have expertise of being professional painter and potter for the last 20+ years
I have learned mind blowing cool tips and insights which makes me a person with ability to improvise and come up with creative ideas and solutions to make stunning and impeccable art pieces of all types which are adored by people across the globe on this website and other platform.