How to bake air dry clay
If you are looking to try something new, why not experiment with using your rubber stamps with clay that has been air-dried? You will have the ability to efficiently manufacture extraordinary objects, ranging from decorations to home décor.
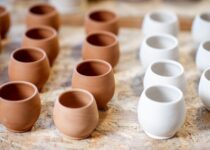
Clay that has been allowed to air dry is a material that may be used for various creative projects due to its adaptability. On the other hand, air-dry clay does not need to be heated to harden, in contrast to polymer clays, which must be baked in an oven to cure, and traditional clays, which must be burned at a high temperature in a kiln.
After it has been allowed to dry, this type of clay may be painted and decorated in various ways while it is allowed to firm and cure at room temperature. The surface of air-dry clay may be ornamented using different techniques. Rubber stamps are a fantastic method to add pattern and texture to a project.
Uses of Air Dry Clay
Clay allowed to air dry can be rolled out and used for modelling and slabbing, pinching, scoring, and welding. Clay that has been allowed to air dry may be used to create beautiful embellishments for cards and other products. On the other hand, the finished items need sufficient time to cure thoroughly; in the case of air-dry clay, this might take up to a week. The exact duration will vary depending on the temperature of the environment as well as the thickness of the item.

Equipment Required
You won’t need specialized tools or supplies when working with air-dry clay. Most crafts that utilize air-dry clay may be completed with little more than a knife and a rolling pin designed exclusively for crafting. When you roll out the clay in preparation for use, it will be helpful if the work area is clean and pristine. Utilizing a board designed specifically for chopping might prove to be advantageous.
Colouring Air Dry Clay
Clay that has been air dried may be painted with a variety of media, including acrylic and tempera paints, markers, and inks. Glitter glue and various other embellishments may be utilized. It is important to remember that because air-dry clay is porous, the finished piece will need to be treated with varnish to protect it.
Using Rubber Stamps on Air-Dry Clay
This is a fantastic idea, use rubber stamps on air-dry clay. The impression left by deeply etched stamps is crisp and clear, while other stamps are more suited for adding texture and repeating designs across a larger area.
When making imprints with rubber stamps on air-dried clay, it’s important to remember that the stamped image acts oppositely from how the picture would look on paper. The stamp’s raised side presses into the clay. This means that the stamps you love may be used to make an array of unique designs.
After using stamps to make impressions in clay, clean them well. Use an old nail brush to clean out any lingering clay from the stamps. you can also put acrylics on your rubber stamp to make it more beautiful.
How to bake air-dry clay: In Brief
- Line on a baking sheet with quality Aluminum foil as This will make it easier to keep the tray clean and will prevent your clay from sticking to it.
- Place your beautifully made sculpture in the oven on your baking sheet. Keeping in mind that the tray will become one of the hotter item in the oven, we will try to possess as little clay lying on the baking sheet as possible to reduce the amount of warping.
- After the oven has been preheated to the lowest heat setting, which is typically between 200 and 250 degrees Fahrenheit, place the baking sheet inside. If you then put your clay in an oven that is already hot, there is a good chance that it may crack.
- The length of time your sculpture requires to be baked for is directly proportional to its dimensions, particularly its thickness. A giant sculpture will take a more significant number of baking’s, but a miniature sculpture about 5 inches tall may often be completed in about 15 minutes.
- To prevent the clay from being too charred, we turned the oven on for 20 to 25 minutes. After 15 to 20 minutes, the ideal method is to continue cooking the sculpture while leaving it in your oven to cool & cure. If the sculpture has not dried completely when the oven has returned to its average temperature, we restart the drying process.
- Exercise caution when removing your sculpture from your oven, especially if the oven is still warm since it might fall. By waiting for it to reach its final temperature, you will be able to determine when the clay has reached its desired dryness level and prevent any newly added clay from unwanted cracking.
Note- Be very careful if your sculpture has any cords that are exposed. They are capable of becoming really hot.
Because the oven significantly reduces drying time, you will have a lot more time at your disposal to work on your artwork than you had in the past. Another advantage of baking your clay is that it is less likely to shatter when handled.

How dry is it?
Now that you know the procedure for drying your sculpture, how can you check to see whether it is genuinely ready to be displayed?
When you engage with your sculpture in various ways,
- It is a bit cool (just like ceramic, your CPC also gets cold as it dries)
- When you press on it, you might feel some give in it.
Make sure that your sculpture has completely dried out before you begin painting it. A crack won’t catch you off guard midway through the process if you do it this way. Continue reading even if the book breaks since it is not difficult to repair.
Air Dry Clay Cracks
If you let the air dry out your clay sculpture, it will break. Embrace it. Clays that dry in the air tend to crack because the shrinkage resulting from the internal water loss, which causes the clay body to dry out.
When working with air-dry clay, prominent reasons for cracking include sculpting over the armature and adding a significant amount of water to mix out the clay or to assist it in adhering to the previous layer.
The clays used for ceramics can also fracture, but because it is difficult to repair these cracks, ceramic artists need to dry out their work carefully to prevent damaging their creations. When working with normal air-dry clay, we need to be concerned less.
How to Easily Fix Air-Dry Clay
Creative If your paper clay has a fissure, don’t worry; fixing it is a breeze. If the crack seems to be not connected to the structure and can hold weight, new clay can be packed into it. If vital parts of your artifact, like the horse’s legs, which are breaking, you may want to try reinforcing them using epoxy based clay. Air dry clays may not be the best option for all different types of sculptures.
Air-dry clays, such as Creative Paper clay, are versatile, durable, and easy to combine with other types of materials, allowing for creation of intricate and novel works of art.
Our expertise results from trial and error; we wish you luck as you push your limits & discover what can you accomplish with these fantastic creative tools!
How to Bake Air Dry Clay: In Detail
If you want to teach your children how to work with clay, you should consider utilizing clay that dries on its own or clay that self-hardens. You may either manufacture your products out of air-dry clay or purchase ones that have already been prepared.
This particular variety of clay is ideal for children since it does not require any glue or other finishing products, which is a relief for both the children and the parents of those children. Removing the clay’s moisture is possible by exposing the pieces to the air and allowing them to dry at room temperature.
Depending on the weather, the size and thickness of your object may take a few days for the surface to dry to a challenging and permanent state, but once it is dry, it will keep its shape for an endless amount of time.
Baking the air-dry clay at a low temperature for around an hour can help speed up the drying process, allowing the children to paint and complete their creations more quickly.
What will You Need?
- Parchment paper
- Oven
- Spatula
- Aluminum baking sheet
Fire up the stove or oven.
Preheat your oven at 200 degrees Fahrenheit. Don’t increase the temperature in an attempt to dry things out faster. If the clay dries out too quickly, it might crack. Because of the quick heating in a microwave, air-dry clay cannot be dried in one. If you have home based kilns for your pottery hobby then you can bake your clay artifacts in that as well.
Start preheating the oven and preparing the baking sheet.
After cutting the parchment paper to the size of the metal baking sheet, lay it down.
Because some types of air-dry clay can’t be used in cooking, place the clay on a baking sheet reserved for arts and crafts.
Shift the chunks of clay around.
When transferring the clay pieces to the baking sheet with a spatula, make sure they have space between them. Even while the clay won’t spread during baking as cookies do, it is still a good idea to give each thing at least an inch of room all the way around.
Toss into the baking dish.
On the oven, put the baking sheet so that it is in the middle rack position. To monitor the progress of the dishes you are cooking without having to open the oven door completely, you should keep it slightly ajar. Additionally, because of this, moisture will be able to escape when the contents dry, which will prevent the oven from heating up to a harmful degree.
Keep an eye on the drying process.
Your goods’ total drying time will be determined by their size and the thickness of their coatings. As the object dries, the colour of the surface will noticeably become lighter. Check on your goods every five minutes to make sure they are drying correctly, and be sure to flip anything that is very thick. When the item seems dry on all sides, you are welcome to remove it from the oven.
Put the puzzle back together.
Before you contact the clay again, give it at least half an hour to cool down. After that, you are free to paint them with any acrylic craft colours you choose. However, you see fit. Clay that has been allowed to air-dry cannot be consumed and cannot be used for waterproofing. Use your creations made from air-dried clay just as embellishments.

FAQ
-
What can be done to prevent cracking when baking air-dried clay?
For clay projects to dry correctly, they must simultaneously be exposed to the air on all sides. Breaking and warping will be less likely as a result. We suggest drying items on a screen or cookie rack, for example, where the airflow is even on all sides.
-
What is the drying time for air dry clay?
Clay that dries in the air starts to dry as soon as air is added. While epoxy clays dry much more quickly and solidify in just a few hours, air-dry clay typically takes at least 24 hours to completely cure (up to a week for some applications).
-
What happens when air-dry clay is baked?
Before baking, clay that has been air dried might split or deform. Avoid using this strategy if at all possible. If necessary, try putting the clay in a dehydrator or desiccant chamber to speed up the drying process.
-
How can clay be used to avoid cracking?
It is crucial to add small amounts of water to prevent minor fractures. To prevent the clay from drying out too quickly while sculpting, mist it occasionally. Never allow the clay to become overly wet.
-
Is air drying or baking clay preferable?
Everyone of any age may use air-dry clay safely, from young children to the elderly. After curing, air-dry clay takes on a consistent form. Unlike oven-baked clay, air-dry clay will not gather up every dust particle.

Being associated with art and craft field since decades as a hobbyist and life long learner has given me an opportunity to learn many new things related to art, craft, paints and pottery which i am trying to share with your guys on this website. I have expertise of being professional painter and potter for the last 20+ years
I have learned mind blowing cool tips and insights which makes me a person with ability to improvise and come up with creative ideas and solutions to make stunning and impeccable art pieces of all types which are adored by people across the globe on this website and other platform.