how to use a pottery kick wheel
Kicking wheels are the most considerable method to begin pottery through the wheel. Mainly they are designed to prepare decorative, elegant, and functional art of pottery, which has been around us since 4000 BC during the Sumerian civilization.
However, gladly modern world didn’t lead a path for the funeral of kick wheel pottery. Countless potters across the globe enjoy wheel pottery as their primary source of happiness to make different types of artifacts from the clay using wheel and then paint them with their favorite color to make them look beautiful.
Using pottery kick wheel simplified
The function of a kick wheel is quite complicated in the beginning; even many potters get anxious while operating a pottery wheel. Therefore, you should follow this guide thoroughly to avoid all those future problems you will face or problems you often face daily.
We are here to overcome your fears and hesitation about operating a pottery wheel. This guide is designed for beginners who are hesitant to operate it.
What is the correct way to use the kick wheel in the beginning?
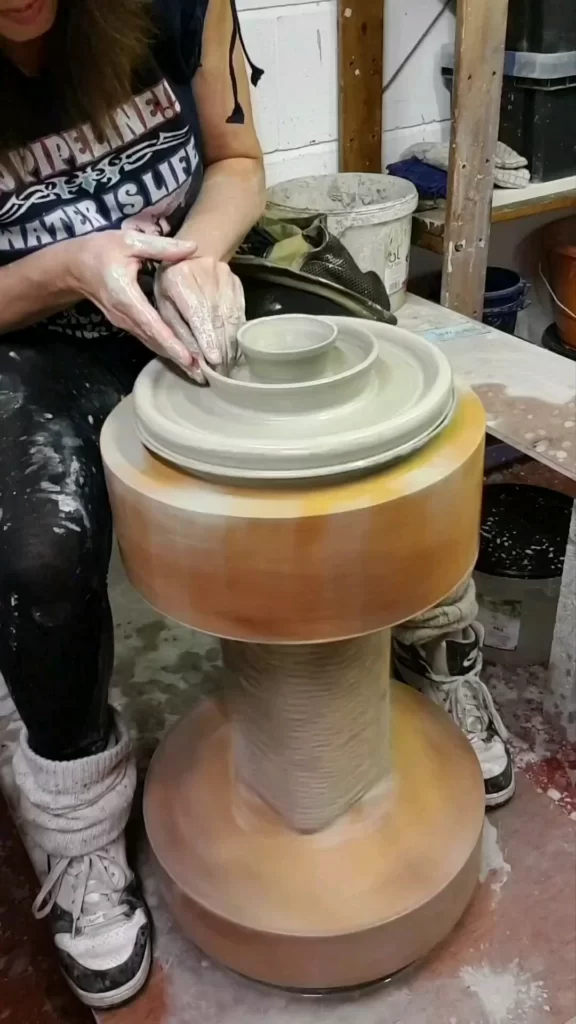
Potters use kick wheels in their everyday routine to make clay pots or vessels by spinning the wheel. This wheel has no motor installed, so the kick wheel becomes feasible to operate without any maintenance cost.
Moreover, the best part about this manual machinery is that it does not require electricity; thus, it offers a green signal to the potter. However, motor wheels are also available for potters; most accept non-motor kick wheels.
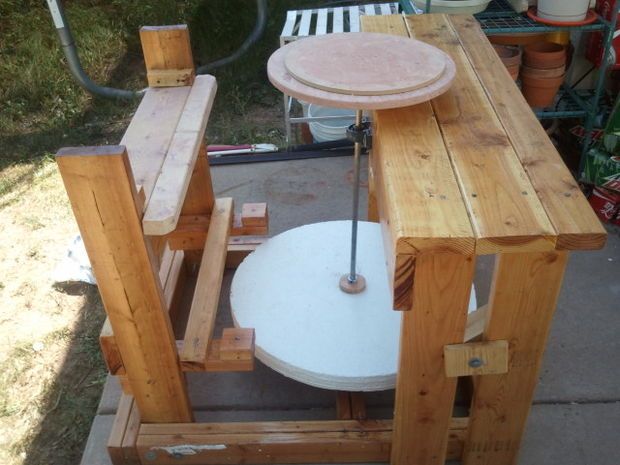
Usually, kick wheels give wooden or steel frames along with steel or heavy concrete flywheel. The basic structure or design is 14 cast wheel head of aluminum and an adjustable seat for the potter. Also, in the very front, there is a worktable for the wheel.
The kick wheel is operated through the potter’s foot, in which a potter has to kick the heavy flywheel continuously, clockwise or counterclockwise. At this speed, clay starts to take shape through the molding process.
Here kicking may sound more accessible to you, but it is a complicated yet exhausting process that requires balance, concentration, and skill. With these factors, a potter can operate the wheel perfectly.
What is the right way to adjust the kick wheel before taking a seat?
It is essential to adjust your seat before starting to indulge yourself in the pottery process. This adjustment will give you the right direction to maintain the position throughout the pottery process and also helps you to kick the wheel while maintaining your balance and concentration.
For perfect adjustability on your wheel seat, lift your seat slightly and turn its direction to create space between the throwing surface and you (potter). Make sure you are seated close to the kick wheel head.
Following that, either slightly raise or lower your seat’s height. Your height and space determine this factor within the surface of the wheel head. Also, it ensures a comfortable experience throughout the pottery process and while you throw clay on the surface.
What is the right way to increase or maintain speed on the kick wheel?
Once the kick wheel starts to move, you can either increase its speed or maintain it throughout the time; this helps you throw the clay on the kick wheel surface. Kick the wheel close to the axle to increase the speed. There are benefits of kicking closer to the axle as it won’t exhaust you, and the wheel will operate smoothly at its maintained speed.
However, kicking on the wheel’s edge harder will only take more time and make you exhausted. This closer version of the wheel head creates a better momentum that stays last for a longer time.
What is the right way to keep your clay center on a kick wheel?
Under this process, a potter has to slam the clay on the head of a wheel. With this, a potter can ensure that clay is already stuck on the wheel’s surface. This step must be done before kicking the wheel.
With the help of a damp sponge, lightly wet the wheel head. Meanwhile, at the center of the wheel, you are required to slam the clay ball.
To spin the wheel, kick at the wheel’s edge and use your foot in a clockwise or counterclockwise direction. The best part about the kick wheel is that a potter can either go forward or go in reverse swiftly.
Remember, do not move your knee down or up because it leads to constant movement in your upper body. Make sure your knees move in a still form and maintain it throughout the pottery process.
Increase the wheel’s speed by kicking continuously on the flywheel, which keeps the clay ball in the center of the wheel head. Once you are used to it, start observing the clay in the center of your wheel surface.
When you apply massive force on the clay ball, it will eventually slow down the kick wheel. Therefore, it is vital to kick in the flywheel’s center to maintain and increase the speed.
When you begin to open the clay ball, it would be better not to kick the wheel as you are already working on your clay. Slightly remove your hand from the clay and focus on the wheel kicking from inside.
What is the right way to open the clay ball on the center surface of the wheel?
Since your clay is already centered, you are now required to proceed with further steps of opening a clay ball. It is pretty simple, wherein a potter is needed to make a hole in between the clay. But you can also use other modes for opening the clay ball that is wholly determined by your preference or skills.
You may know this but the kick wheel of the potter is heavy. When you kick the flywheel, which increases the speed, you are now ready to work on the clay because the wheel head is starting to spin.
Put your thumb in between the clay and push another half inch when you want to trim the clay’s bottom. Meanwhile, use your other hand to hold the clay to make it stable.
When the flywheel or wheel’s head lowers the speed, a potter must remove the hands from the clay. Following that, continuously kick the wheel’s center in a clockwise or counterclockwise direction.
Compress clay’s bottom and create its structure
Following this part’s steps, a potter can create the pot’s base or structure. It happens because a potter had made a hole in the middle of the clay. if you want to know more hand building with clay then read our guide about the same.
Under this process, a potter can remove hands from the clay base and continuously kick the wheel to increase the speed of the head. Now put your fingers inside the clay’s hole and gently push it to the edge. Meanwhile, your other hand should support the clay pot wall, which takes shape by spinning on the wheel. Continue pushing the clay to its edges till the time it opens massively and gets in the shape which you desire. Later, compress the pot’s bottom.

Uplift the walls
Now a potter can slow the speed of the flywheel and wheel’s head while uplifting the pot’s walls. Follow the wheel’s momentum when it begins to lower the rate. Then it is your turn to continue kicking the flywheel until it reaches your desired speed. Due to the flywheel’s weight, a potter cannot boot in a massive amount.
This step should continue by controlling the speed of a wheel. Make sure you are repeating this process for a longer time, throwing the pot in the middle of kicking the wheel. Also, freely let the flywheel move at its speed when you throw the pot.
Give finishing and shaping to the pottery.
There is a higher probability that the top of the pot may become uneven because a potter is thinning the walls. Finishing and shaping also involve other steps in determining your desired shape for the pot.
So when you are shaping the pot, you must slow down the flywheel because you are smoothing the uneven sides of the pot. Use a cutting or needle tool to remove all the excessive parts from the pot.
Carefully press a pin against the spinning clay pot until all the excessive clay gets removed. While performing this step, slow down the wheel speed; otherwise, it may remove all required clay from the pot and ruin the shape.
How to lower the speed of a kick wheel and how to stop it?
When you are about to complete the throwing process, allow some rest to the kick wheel, eventually reducing the speed. However, do not lower the speed when you are shaping the pot.
Gradually, the wheel starts to slow down, and then it will stop. Also, you can press the flywheel from your foot to lower the speed or prevent it from spinning. Following that part, lift the pot from the throwing surface. Use a wire cutter or cutting tool to remove the excessive clay piece at the bottom while you lift the pot. Your masterpiece is ready to proceed for further steps, including firing and decoration.
When the wheel gets stopped, clean the throwing surface for another process. Cleaning the surface is relatively easy. Spin the wheel and use a cutter on the spinning wheel to scrape off the excessive clay. Then use a quality damping sponge to clean off clay completely. When the rotation gets stopped, you are ready to throw another clay pot on it and repeat the entire process.
Conclusion
Now you get the desired results and know the crucial steps that need to be followed to prepare a pot. Also, you must learn about the proper steps to operate a kick wheel. However, it is not an easy process to perform pottery. But by practicing consistently, one can master this skill which you can pass down to other generations.
We hope that this must be a helpful guide for you. Going through this entire guide may develop confidence in operating a pottery wheel.
FAQ
What is the procedure for working these pottery kick wheels?
Use swift and effective kicks to spin the wheel that should be done from the center flywheel in a clockwise and counter-wise direction. With that, a potter can maintain the speed from the foot and mold the clay ball in the desired shape. Also, place and adjust the seat in front of the worktable and wheel head.
Is purchasing a potter wheel worthy of its hype?
Investing your money in a professional pottery wheel would be better if you want to attain pottery skills. As potters always spend their time throwing the clay on the wheel’s surface. These wheels are expensive and start from the range of $1000. But they have the higher durability and power to carry the weight of 400 to 500 pounds.
How much time does it take to master the pottery wheel?
Mastering the basic strategy of throwing clay on the surface takes five weeks. When you learn more about clay, you start to know how to push it. With this, you can operate the wheel properly and give it a desirable shape.

Does wheel spinning directions determine the pottery process?
Generally, it has been suggested to all potters to use an anti-clockwise direction if they are right-handed. On the other hand, left-hand persons can implement a clockwise direction in the pottery process. It is easy to throw on the wheel along with the right strategies, and a potter does not require more complex force. Thus, direction determines a pottery process.
Can I use a bat for the pottery wheel?
No, a potter does not require a bat to throw the clay pot on the wheel.
What is the reason behind failing to put clay in the center?
It is due to a wet clay ball. Do not add excessive water while engaging yourself in pottery making process. However, if it still becomes a case, you should implement a wedge step to remove unnecessary moisture.
What is the cost of a pottery wheel for the newbies?
It all begins with a right pottery wheel that costs you around $650. to know more about of pottery wheel read our guide for complete cost understanding.

Being associated with art and craft field since decades as a hobbyist and life long learner has given me an opportunity to learn many new things related to art, craft, paints and pottery which i am trying to share with your guys on this website. I have expertise of being professional painter and potter for the last 20+ years
I have learned mind blowing cool tips and insights which makes me a person with ability to improvise and come up with creative ideas and solutions to make stunning and impeccable art pieces of all types which are adored by people across the globe on this website and other platform.

How to build a pottery kiln

How much does a pottery wheel cost
