How to Make Pottery
Why should I create pottery? Do you let people create ceramics in your home? Do you have any recommendations for enhancing my pottery?
If you have contemplated any of these options, you are not alone.
This article will significantly assist novices as it will help them better comprehend the process and some of the skills necessary to manufacture their pottery. It will provide a broad overview of the pottery-making process, adding more specific parts later.
Beginning a pottery pastime does not have to be costly or complicated, nor does it need specialized equipment. Find a friendly potter or pottery business willing to fire your pots until you determine whether this is a worthwhile pastime. The only difficulty will be igniting the pots.

Ceramic Safety
In all circumstances, safety comes first! There are a few things to watch out for a while producing pottery, even though it is not a very hazardous activity. Many things to avoid:
- Avoid contact with clay particles to reduce lung damage caused by silica. Mop rather than sweep, sponge rather than a brush, and use a mask while dealing with dust. (CDC, for further details)
- Kilns that are too hot to handle must be avoided at all costs.
- Avoid sharp instruments and machinery if you don’t want to pierce, cut, or fracture parts of your body while working.
- Unhealthy ergonomics: Spending hours hunched over a wheel or workstation harms the spine.
- Transporting enormous quantities of heavy clay, glaze buckets, pot-filled boards, etc.
- To keep yourself and anyone who uses your pots safe, you should learn about or avoid these dangerous substances.
- Okay, so it’s not exactly dangerous, but the clay seems to dry the hands of specific individuals more than others.
Use your common sense, too. Don’t do stupid things like put plastic bags over your head, eat glazes, or leave broken pots lying about your studio.
Common Pottery Tools
- Non-stick ribs of wood, metal, rubber, and plastic are available in various sizes and shapes.
- Knives for carving and cutting, wire cutters, loop/ribbon tools, needle tools, rubber stamps, handmade bisque stamps, pattern rollers, and other stamps and texture tools.
- Brushes are available in a variety of materials, sizes, and shapes.
- Sponge types include natural sea sponges used for ceramics, economical rectangular sponges, etc.
- Examples of measuring equipment include scales, rulers, callipers, and a rolling pin.
How to Organize Your Space
When the clay is ready, your workstation should be prepared. This may contain a clean, sharp instrument, water, a nonstick work surface, plastic to cover the work, a location to dry the work, etc. The majority of your needs will depend on how you create your ceramics.
Pinch pots may be created with a few tools, a tiny amount of room, a small kiln, and some glaze. One would need a pottery wheel, throwing tools, a big kiln, and sufficient room to manufacture and store the jugs to construct gigantic jugs.
The making of clay pots
Clay is being pinched.
The simplest way to form clay into pottery is by squeezing it between the fingers. Start with a lump of clay. Make a hole in the ball by pressing down on its centre. Then, crush the clay between your fingers along the whole side length. To form a bowl or cylinder from the clay, press and compress it.
The wheel is in motion.
Throwing on a wheel seems to be the most popular method for producing pottery. A pottery wheel is a revolving tool with variable speeds. Clay is attached to the head of the wheel and shaped by hand or with instruments while the wheel revolves. Typically, after the pot has been made and cured, the wheel is removed.
Containers are arranged in Blocks.
To form slabs, clay is rolled, split, stretched, or pressed flat. These slabs may be sliced into various forms, joined together, and manipulated to create containers and sculptures.
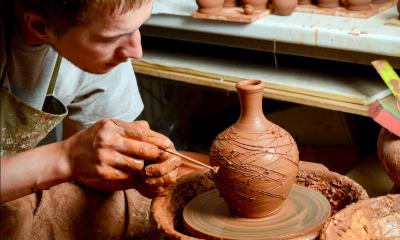
Vase constructed of coils.
It is possible to extrude clay into long, rope-like coils or to cut, roll, or slice it. These coils may be connected to form the walls of a vessel or intriguing surface patterns.
Extrusion Containers and Parts
A die that makes coils, strips, and even hollow things are driven through clay. Constructing vessels by combining extruded components or adding handles or other appendages is possible.
Utilization of ceramic moulds
Typically, a mould is an absorbent surface that duplicates the inside or outside of the required vessel. Ceramic moulds are the conventional method for producing several identically sized and shaped pots. In addition to press moulds, slip casting, jigger and jolly, and hump and slump moulds, there are many methods for creating moulds.
Elements of a Pot
Understanding the many components of a pot is advantageous while learning pottery, mainly when offering or receiving feedback.
Details and additions
After completing the primary form, you have the opportunity to meet this additional step. This essentially includes anything that can be done to alter the original shape somehow.
Bisque firing
Shooting a biscuit is a discretionary ability. Numerous potters bisque-fire their wares to make them more suitable for glazing and other surface treatments. After being completed and thoroughly dried, the pots are fired at a high enough temperature to make them hard and permanent, comparable to glass but porous.
The clay cannot be vitrified during the bisque firing; this often happens during a second, more intense firing. Some low-fire clays may be bisque-fired at a slightly greater temperature than when baked with the glaze—numerous potters bisque-fire to cone 04, or around 1945 degrees Fahrenheit.
Surface embellishment is optional.
Particular potters believe that surface ornamentation is carving or texture. This is technically correct and logical. However, for the sake of this article, “surface decoration” will be defined as anything applied to the non-clay surface of a vessel. Specific methods demand that the decorating be finished before the bisque is fired.
There are a variety of techniques for creating bisque-burnt pots. On a single vessel, potters often use a range of decorative methods. Some of the below-described processes may be utilized with the techniques above for altering the clay.

How to Decorate Clay Before Firing
Consider using the following techniques to add texture to your clay before firing it.
- Mark, stamp, or incise the clay surface to provide texture.
- Squeeze and buff the surface until it becomes gleaming.
- On the surface of the clay, coloured clay slips or liquid clays may be used to paint, stamp, inlay, trail, or create other aesthetic effects.
- A combination of materials that, when heated, melt and fuse with clay to produce a vitreous surface.
Many potters use glaze to add colour, texture, or functionality to their work. When the ice reaches the appropriate temperature, it often transforms into a complex, glassy surface on the clay, enhancing its aesthetic and functional features.
Some potters create their glazes, although ready-to-use commercial glazes that have already been combined with water are also available. Glazes may be applied using a clean paintbrush, a dip, a pour, or a spray.
How to Glaze Ceramic Biscuit Firing Pottery
Glazes are often applied before or after the first low-temperature fire, sometimes known as the “biscuit firing,” typically between 900 and 1000 degrees Celsius. The biscuit firing renders the clay robust yet porous, allowing it to absorb the glaze.
The most frequent glazing procedures include painting, pouring, dipping, and spraying. During the firing process, glazes melt and solidify to create a watertight, crystalline surface. Depending on the materials used, glazes may have various textures and hues.
Potters can purchase pre-made glazes or create their own from dry components acquired from ceramic merchants.
Glazing firing
There are three fundamental temperature ranges for firing glazes. Potters make decisions based on the desired objectives or the clays they are working with. Clays and glazes for earthenware would fully melt at stoneware or porcelain temperatures. In addition, the clay and glazes of stoneware and porcelain cannot form at earthenware temperatures.
Surfaces of the surroundings
When pots are burnt, pollutants in the surrounding air may settle on the pots in the kiln or the saggar. These substances may melt into the pot, resulting in fascinating surface textures, patterns, and hues.
The results are often unexpected when a vessel is coated with glaze alone. Ash is one of the chemicals that might potentially interact with clay during a fire.
Freezing Conclusions
A “cold finish” is any substance that may be applied to an unfired pot, often for aesthetic reasons. Since the majority of these finishes are not meant for use with food or beverages, they are often applied to sculptures. Standard cold finishes include paint, waxes, shoe polish, stains, dye, adhesive, sap, metal leaf, and sealants.
You could accomplish almost anything. Consider considerations like ease of application, lightfastness, durability, the strength of the binding to clay, the location where the item will be shown, etc., when choosing a finish.
Clay suitable for firing
There are several techniques for burning ceramics. How a pot was burnt has a significant impact on its appearance. The outcome of firing the same pot in two different kilns, or even in two different sections of the same kiln, may vary significantly.
Kilns for pottery
A kiln is an enclosed space with temperatures high enough to transform clay and glaze permanently.
Kilns are often categorized or characterized by characteristics like as:
- Heat sources include electricity, gas, propane, wood, and other combustibles.
- Bricks made of ceramic fibre, hard brickwork, and soft bricks
- Airflow is composed of cross-draft, updraft, and downdraft.
- Available forms include oval, octagon, catenary, sprung, single-chamber, multi-chamber, train, vehicle, and snake.
- Air has neutral, oxidizing, and reducing characteristics.
Standard Kilns and Firing Techniques
- Kilns with electrical power: These ovens, often constructed from brittle bricks, are heated by electrical coils in an oxidizing or neutral environment.
- Gas Kilns: Typically, natural gas or propane gas is used to create a reduced environment in gas kilns.
- Wood: Most wood kilns are bigger than gas and electric kilns and are fueled by wood combustion.
- Pit firing: Pots are put in a pit or barrel with wood, sawdust, and other flammable materials for pit fire.
- Raku: To create various characteristics, the kiln is opened while still ablaze, and red-hot pots are taken and put in flammable material.
Completing the pots
After the kiln has cooled and the pots have been retrieved, it may be required to exert more effort. If outcomes are not always as predicted, the approach may produce a pot with unwanted characteristics. On occasion, a pot may be repaired or refired. Occasionally, it may seem dismal. Eventually, if you construct enough pots, you may experiment with the following:
- Cleaning
- The undersides are being sanded.
- Sanding unfinished surfaces
- Polishing
- Re-Firing
- Additional adjustments to fired pottery
- Destroying the defective pots

How to Make Pottery Clay
To prevent your pieces from collapsing under their weight while constructing by hand, you must allow the component to dry before proceeding.
Work-in-progress must be cared for, wrapped, and sprayed with water between sessions to prevent drying and preserve the proper consistency.
Clay joints operate most effectively when the clay is moist or firm but not dry, and all the parts have the same rigidity.
Score the clay, add a little water or slurry, and press firmly together. To strengthen the bond, rub soft clay over it.
While dealing with clay, capturing its consistency at the precise moment is essential. It is pretty simple to make a mistake in this situation if you are either too eager or impatient, causing the clay to get too soft and collapse, or if you leave the clay out for too long, causing it to dry out and crack as you work so try to keep clay in box or covered.
To prevent the clay from drying out, keep it well-wrapped.
Clay may be recycled by collecting all dry shards and scraps and then adding water to a container. Before breaking down into a slurry and being kneaded into a workable condition, dry clay may be cured on boards.
FAQ
-
Is pottery a worthwhile pastime?
Clay-making is a delightful pastime. It is used to produce stunning works of art that captivate everyone. This may make pottery a fun time, but most people avoid it because they believe it will be expensive.
-
How quickly can you pick up pottery?
Frequently, a skilled potter develops over time. In this art form, there is always something new to learn. After mastering the fundamentals, you will be astounded at what you can create! Nevertheless, with work and experience, anybody can know to make pottery.
-
Is ceramic production beneficial to mental health?
Pottery is often described as calming and soothing. As you focus on your creative aims and aspirations, your body and mind work together naturally to spin clay. This contemplative and creative practice may help you clear your thoughts and feel less stressed about the world outside.
-
How much do pottery sales bring in revenue?
The hourly wage for senior potters is $25, whereas the hourly salary for intermediate potters is roughly $20. The highest-paid potters may make over $30 per hour! After determining the value of your time, examine the price of your raw materials and the cost of firing your kiln.

Being associated with art and craft field since decades as a hobbyist and life long learner has given me an opportunity to learn many new things related to art, craft, paints and pottery which i am trying to share with your guys on this website. I have expertise of being professional painter and potter for the last 20+ years
I have learned mind blowing cool tips and insights which makes me a person with ability to improvise and come up with creative ideas and solutions to make stunning and impeccable art pieces of all types which are adored by people across the globe on this website and other platform.

What To Do When Clay is Too Wet

What is Raku Pottery: Detailed overview with tips
